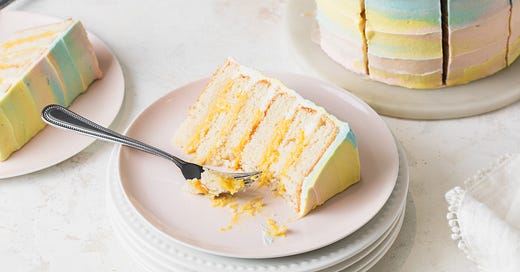
Birthday Cake Club: Pineapple Coconut Cake
Vacation in your own kitchen with this 6-layer, rainbow tropical cake!
Hi Bakers!
Shout out to all you summer babies! You know, the ones with birthdays while everyone is on vacation when you are trying to make plans to celebrate.
July birthdays - I see you.
And even if your friends are away on holiday, you can celebrate with your Birthday Cake Club and this tropical Pineapple Coconut Cake.
Confession: I have Hawaii on my mind. With plans to head back to visit my family soon, I can’t stop thinking about all things tropical. Until then, this Pineapple Coconut Cake is giving me island vibes while I daydream of warm, sandy beaches.
This cake is made up of fluffy coconut cake layers, pineapple curd, and creamy coconut frosting. While I love each component of the cake on their own, it’s the sharp, sweet pineapple that is the star of the show. Have you tasted pineapple curd before? You must!
The coconut flavor is subtle, but canned coconut milk adds tons of richness and makes the cake extra tender. If you’d like a stronger coconut taste, you may add a teaspoon or two of pure coconut extract to the cake and/or frosting.
While you might want to add some toasted flakes to the outside for texture, I went with this dreamy rainbow design. The way the pink, yellow, and blue buttercreams swirl together remind me of rainbow shave ice. See, I told you I have Hawaii on my mind!
The frosting uses an Ermine buttercream base. It begins with a cooked flour and coconut milk custard that is then whipped with softened butter and cream cheese. It is silky and smooth like meringue-based buttercreams, but without the eggs.
For the layers, I split each cake in half horizontally to create 6 thinner layers of cake and 5 modest layers of pineapple curd. Both the curd and frosting are relatively soft, and the weight of the unsplit cake layers was making the filling squish out. Notice that there is only a thin layer of curd between each layer. If necessary, chill the cake as you are stacking to make sure that it is sturdy and that no curd is slipping out between the layers.
Tips for Making Ermine Frosting:
The key to smooth Ermine frosting is temperature control. The base and butter should both be room temperature when whipped together. For best results, use right after mixing.
If the frosting feels heavy and thick then it is likely too cold and has not had enough time to mix. It should be weightless and silky, but not greasy. You may gently warm the frosting using a double-boiler or by microwaving a very small amount and mixing it back in until smooth and spreadable.
If the frosting is too soft to spread and slips off the cake, then it is likely too warm. Try placing the frosting in the refrigerator for 10 to 15 minutes, then re-mixing until smooth and spreadable.
Enough daydreaming, let’s get to the recipe!
Keep reading with a 7-day free trial
Subscribe to Tessa Huff's Bake Club to keep reading this post and get 7 days of free access to the full post archives.


